Walk-in refrigerators aren’t just for restaurant kitchens and grocery stores anymore. Homeowners with serious food preservation needs, hunters, gardeners, caterers working from home, or anyone with bulk storage requirements, are increasingly installing these units. Unlike your standard side-by-side or even a standing freezer, a walk-in cooler offers massive storage capacity in a temperature-controlled room you can actually step inside. But before you start planning one for your basement or garage, you need to understand how they work, what they cost, and whether your space can handle the installation. This guide covers everything from basic components to maintenance schedules, helping you decide if a walk-in refrigerator makes sense for your situation.
Table of Contents
ToggleKey Takeaways
- A walk-in refrigerator offers massive storage capacity—a 6′ x 8′ unit provides roughly 350 cubic feet of usable space equivalent to eight household refrigerators, making it ideal for hunters, gardeners, and home-based food businesses.
- Walk-in refrigerators maintain tighter temperature tolerances than residential units and can be more energy-efficient per cubic foot than running multiple household refrigerators simultaneously, though total power draw ranges from 1,500 to 3,000 watts.
- Installation requires significant upfront investment ($5,000 to $15,000), dedicated structural space with 8-foot ceilings, proper electrical service (30–50-amp circuit), and professional refrigerant work by EPA-certified technicians.
- Before purchasing, verify your space can support the load (50–75 psf when fully stocked), measure dimensions around standard panel sizes to avoid expensive custom cuts, and check local permitting requirements with your building department.
- Monthly maintenance including condenser cleaning, gasket inspection, and interior sanitizing, plus annual professional service by an HVAC contractor, keeps your walk-in refrigerator operating efficiently and extends its lifespan beyond a dozen household units.
- A walk-in refrigerator makes sense if you regularly process over 200 pounds of meat annually, preserve 50+ quarts of produce, or operate a cottage food business—otherwise, a quality chest freezer may be the more practical choice.
What Is a Walk-In Refrigerator and How Does It Work?
A walk-in refrigerator is essentially a sealed, insulated room equipped with a dedicated refrigeration system. Unlike traditional refrigerators that use a single compressor unit tucked underneath or behind the appliance, walk-ins rely on a remote condensing unit or self-contained system mounted on the exterior wall or roof.
The refrigeration cycle works the same as any cooling system: refrigerant absorbs heat from inside the box and releases it outside through the condenser. The difference is scale. Walk-in units typically run on 208-230V or 460V three-phase power (though some smaller residential models can operate on standard 208-230V single-phase). The evaporator coil sits inside the insulated space, while the compressor and condenser handle the heavy lifting outside.
Insulated panels, typically 4 inches thick with polyurethane or polystyrene cores, lock together with cam-action fasteners to form the walls, ceiling, and floor. These panels carry R-values between R-25 and R-35, far exceeding typical home wall insulation. The door includes a heavy-duty latch with interior safety release (required by code) and often a heated door frame to prevent ice buildup at the seal.
Temperature control is managed by a digital thermostat that cycles the compressor. Most units hold between 34°F and 38°F for refrigeration or down to -10°F to 0°F for walk-in freezers. Airflow inside is driven by evaporator fans, which circulate cooled air to prevent hot spots.
Key Benefits of Installing a Walk-In Refrigerator
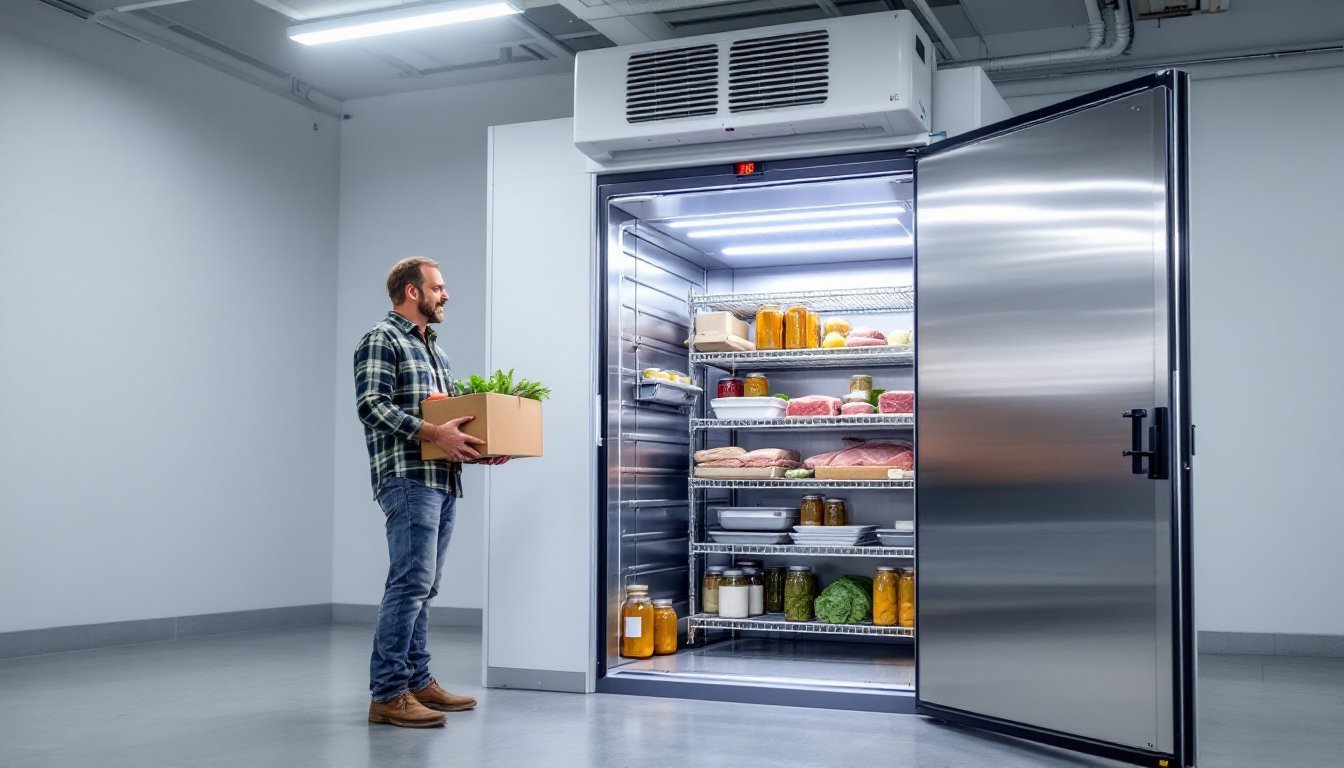
The primary advantage is storage capacity. A standard 6′ x 8′ walk-in offers roughly 350 cubic feet of usable space, equivalent to about eight full-size household refrigerators. For hunters processing deer or elk, gardeners preserving seasonal harvests, or anyone buying in bulk from warehouse clubs, that volume is hard to beat.
Organization and accessibility improve dramatically. Instead of digging through chest freezers or cramming items into a standing unit, you can walk in, see everything at a glance, and use shelving systems designed for commercial kitchens. Wire shelving from manufacturers like Metro or Cambro allows airflow around products and supports heavy loads.
Energy efficiency per cubic foot can actually be better than running multiple household units. A properly insulated walk-in with an efficient compressor uses less energy per square foot of storage than three or four Energy Star fridges running simultaneously. But, total energy draw is still significant, expect 1,500 to 3,000 watts during compressor cycles.
Temperature consistency is another benefit. Commercial-grade refrigeration systems maintain tighter tolerances than residential units, which matters if you’re storing high-value items like game meat, specialty cheeses, or temperature-sensitive produce. Many restaurant kitchens and home caterers rely on walk-ins for this reason.
Finally, there’s resale value if you ever convert a home-based food business into a commercial venture. A permitted, properly installed walk-in cooler adds significant value to a property zoned for food service or agricultural use.
Walk-In Refrigerator vs. Standard Refrigeration: Which Is Right for You?
Most homeowners don’t need a walking refrigerator. If you’re storing a week’s groceries and maybe some leftovers, stick with a standard refrigerator or add a garage freezer.
Consider a walk-in if you regularly process more than 200 pounds of meat annually, preserve 50+ quarts of produce, or run a cottage food business from home. The upfront cost is steep, $5,000 to $15,000 for materials and installation depending on size and features, but the per-cubic-foot cost drops significantly at scale.
Space requirements are the biggest limiting factor. You need a dedicated room or a section of a basement, garage, or outbuilding with at least 8-foot ceilings (to accommodate panel height plus the evaporator unit). The floor must support 50 to 75 pounds per square foot when fully loaded, which exceeds typical residential floor loading in some older homes.
Electrical service is another consideration. A walk-in pulls significant amperage, so you’ll likely need a dedicated 30- to 50-amp circuit. Expect to hire a licensed electrician: this isn’t a DIY electrical job unless you’re already comfortable working inside your main panel and pulling permits.
Permitting and code compliance vary by jurisdiction, but most areas require permits for electrical work and possibly for the structure itself if you’re building an outdoor unit. Check with your local building department before ordering materials.
For hunters and gardeners who don’t need year-round access, a quality chest freezer (or two) may be the better choice. They’re cheaper, require no structural work, and run on standard 120V outlets. But if you’re regularly walking into a crowded garage freezer wishing you had more room, a walk-in starts to make sense.
Essential Components and Features to Consider
Start with panel construction. Foamed-in-place polyurethane panels offer better insulation and fewer thermal bridges than polystyrene. Look for tongue-and-groove cam-lock systems, they’re easier to assemble and disassemble than older bolt-together designs. Panels come in standard sizes (typically 4′ wide), so plan your dimensions accordingly to minimize cutting.
The refrigeration system is where you’ll make the biggest performance and cost trade-offs. Self-contained units mount directly on the exterior wall and include the compressor, condenser, and evaporator in one package. They’re easier to install but noisier and require the walk-in to have an exterior wall. Remote systems place the noisy compressor and condenser outside (on a roof or pad), connected to the evaporator by refrigerant lines. They’re quieter inside but require professional installation and refrigerant charging.
Pay attention to temperature range. Refrigeration units (34°F to 38°F) are less expensive than freezer units (-10°F to 0°F), which require more insulation and larger compressors. If you need both, some operations install a walk-in cooler with a reach-in freezer inside it, though that’s overkill for most homes.
Door configuration matters more than you’d think. Standard doors are 34 to 36 inches wide, which is tight when carrying a deer quarter or rolling in a cart. If space and budget allow, a 4-foot door improves usability. All doors must include an interior safety release, this is code in commercial applications and a life-safety issue you shouldn’t skip at home.
Additional features to consider:
- Door heaters to prevent condensation and ice buildup at the gasket
- Interior lighting (LED strips are energy-efficient and don’t generate heat)
- Alarm systems that alert you to temperature deviations or power loss
- Floor insulation if installing in a basement or over a concrete slab (prevents condensation and improves efficiency)
- Shelving and racking designed for cold, high-humidity environments
Installation Requirements and Space Planning
Measure twice, order once. Walk-in panels come in fixed sizes, and returning them is expensive. Standard widths are 4, 5, 6, 8, 10, and 12 feet. Heights are typically 7’6″ or 8′. Plan dimensions around panel increments to avoid custom cuts.
Floor preparation depends on location. Concrete slabs are ideal, they’re strong, level, and moisture-resistant. If you’re installing over a wood subfloor in a basement, verify the floor joist spacing and species. Most residential floors are built for 40 psf live load, but a fully stocked walk-in can exceed that. You may need to sister additional joists or add support posts in the basement below. This is structural work, consult a licensed contractor or engineer if you’re unsure.
If condensation is a concern (it usually is in basements), install a vapor barrier under the walk-in or use insulated floor panels. Skipping this step leads to moisture problems and potential mold growth.
Clearance around the unit is critical. The condensing unit (whether self-contained or remote) needs airflow. Leave at least 12 inches on the sides and 24 inches in front for service access. Remote condensers mounted outside need to sit on a level pad, either a concrete slab or a composite equipment pad rated for the unit’s weight.
Electrical rough-in should happen before panel assembly. Run conduit and wire to the planned location of the evaporator and condensing units. Use THHN wire rated for the amperage, and size the circuit according to the manufacturer’s specs (typically 125% of the unit’s full-load amperage). Install a disconnect switch within sight of the condensing unit, required by NEC Article 440.
Panel assembly is a two- or three-person job. Panels aren’t impossibly heavy (80 to 120 pounds each), but they’re awkward and require precise alignment. Start with the floor (if using insulated floor panels), then walls, then ceiling. Cam locks pull panels tight: don’t overtighten or you’ll strip the plastic cams.
Once panels are up, install the door, mount the evaporator inside, and connect refrigerant lines (if using a remote system). Refrigerant work requires an EPA-certified technician, this is federal law, not a suggestion. A tech will pressure-test the lines, pull a vacuum, charge the system, and verify operation.
Maintenance Tips to Keep Your Walk-In Refrigerator Running Efficiently
Walk-in refrigerators are workhorses, but neglect will cost you. Budget for quarterly inspections and address small issues before they become expensive failures.
Monthly tasks:
- Clean the condenser coils. Dust, pollen, and debris reduce heat transfer and force the compressor to work harder. Use a coil brush and shop vacuum. If the unit is outside, check for leaves, grass clippings, or insect nests.
- Inspect door gaskets. Run the dollar-bill test: close the door on a bill and pull it out. If it slides out easily, the gasket isn’t sealing. Replace worn gaskets immediately, they’re cheap, and a leaky door wastes energy.
- Check the door latch and safety release. Make sure the interior release operates smoothly. Lubricate with food-grade silicone spray if it sticks.
- Wipe down interior walls and shelving. Condensation and food residue can harbor mold. Use a mild detergent and rinse thoroughly.
Quarterly tasks:
- Test the defrost cycle (if equipped). Ice buildup on the evaporator coil reduces efficiency. Most units have automatic defrost: verify it’s working.
- Inspect refrigerant lines for signs of oil residue (indicates a leak). If you see oily spots, call a tech.
- Check electrical connections at the disconnect and inside the control box. Tighten any loose terminals (power off first).
- Verify accurate temperature. Use an independent thermometer to confirm the digital readout matches actual interior temp.
Annual professional service should include:
- Refrigerant charge verification
- Compressor amp draw test
- Evaporator and condenser fan motor inspection
- Control calibration
- Safety release function test
Many HVAC contractors who service commercial equipment can handle walk-in coolers. Expect to pay $150 to $300 for an annual tune-up.
Energy-saving tips:
- Keep the unit as full as possible. Thermal mass stabilizes temperature and reduces compressor cycling.
- Avoid opening the door during the hottest part of the day.
- If you’re in a hot climate, shade the outdoor condenser unit.
- Consider a strip curtain inside the door to reduce cold air loss during frequent access.
Conclusion
A walk-in refrigerator is a significant investment, but for the right situation, serious hunters, large-scale gardeners, or home-based food businesses, it’s the most efficient way to store bulk quantities. Success comes down to proper planning: verify your space can handle the load, budget for professional electrical and refrigeration work, and commit to regular maintenance. Done right, a walk-in cooler will outlast a dozen household refrigerators and pay for itself in saved trips to the store and reduced food waste.