A red light on a Shark vacuum isn’t something to panic about, but it’s definitely trying to tell you something. This indicator is built into the vacuum as a safety feature, it’s designed to alert users to specific problems that could damage the motor or reduce suction performance. Whether you’ve just noticed the light during a cleaning session or it’s been flashing for days, understanding what triggers it and how to fix the issue will get your vacuum back to full power. Most red light problems stem from straightforward causes like blockages or overheating, and the majority can be resolved in under 15 minutes with basic tools you already own.
Table of Contents
ToggleKey Takeaways
- The red light on a Shark vacuum is a diagnostic warning system triggered by airflow blockages or motor overheating, and most issues can be fixed in under 15 minutes.
- Common causes include clogged hoses, blocked brush rolls, and overstuffed dust cups—clear these components first to resolve the red light.
- Follow a step-by-step troubleshooting sequence: unplug the vacuum, empty the dust cup, clean filters, check hoses and brush roll, and allow the motor 45 minutes to cool before reassembling.
- Prevent future red light warnings by emptying the dust cup after every use, cleaning filters monthly, and inspecting the brush roll weekly.
- If the red light persists after completing all maintenance steps, contact Shark customer support at (800) 798-7398, as the issue may require professional repair.
Understanding Your Shark Vacuum’s Red Light Indicator
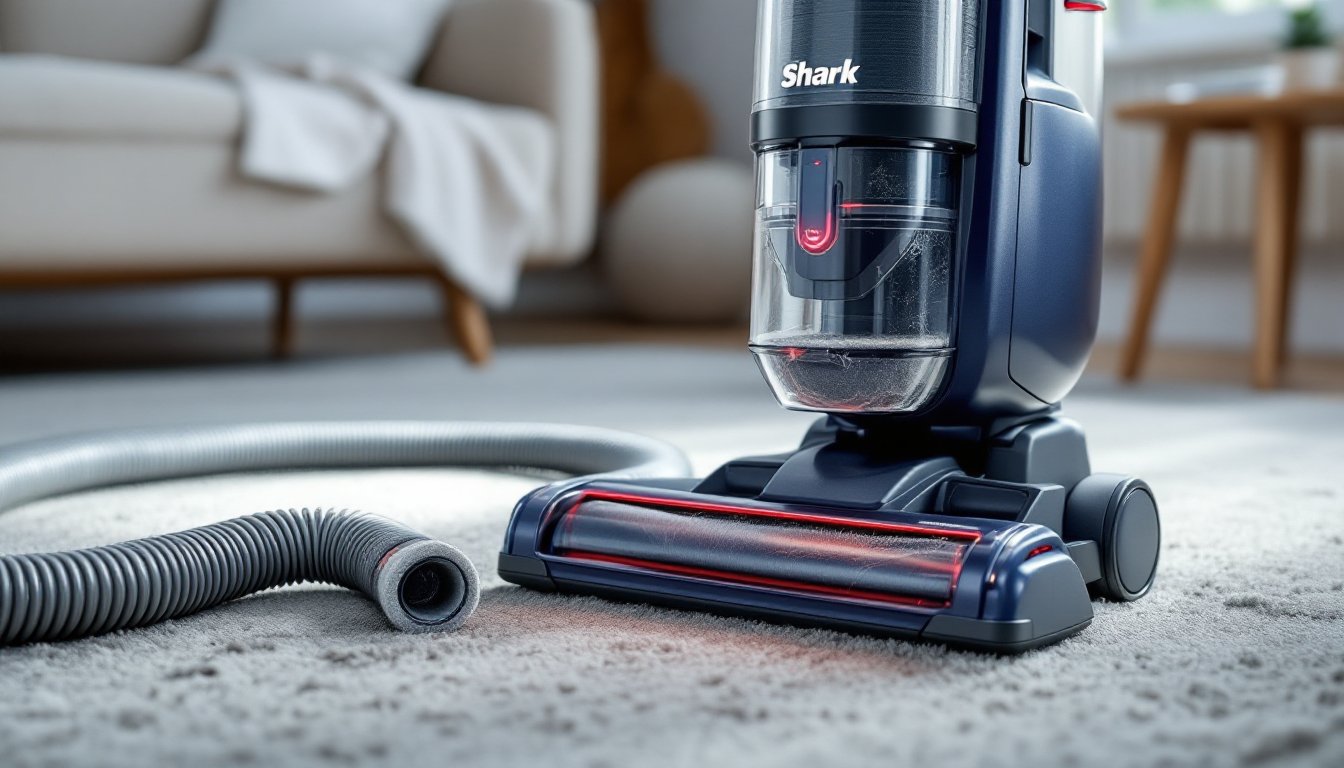
The red light on a Shark vacuum serves as the machine’s primary warning system. It’s hardwired to activate when the vacuum’s internal sensors detect conditions that could cause motor burnout, reduced airflow, or component failure. Unlike simple power indicators, this light is diagnostic, it’s alerting the user to an active problem that needs immediate attention.
Most Shark models position the red light near the brush roll housing, on the handheld unit, or integrated into the dust cup assembly. The exact location varies by model (Navigator, Rotator, Vertex, Rocket, etc.), but the function remains consistent across the lineup. When the light turns red, the vacuum may also emit a beep or automatically reduce suction to protect the motor.
The two primary triggers for the red light are airflow restriction and motor overheating. Airflow restriction occurs when something blocks the path air needs to travel through the vacuum, hose, filters, dust cup, or brush roll chamber. Overheating happens when the motor runs too long under strain, often caused by a blockage that forces the motor to work harder to maintain suction. Both conditions can damage internal components if ignored, so the red light acts as an early intervention.
Some Shark models differentiate between a solid red light and a flashing red light. A solid light typically indicates a blockage somewhere in the system. A flashing light often signals overheating or a brush roll jam. Check your owner’s manual for model-specific diagnostics, as certain units include additional color codes or patterns.
Common Causes of the Red Light on Shark Vacuums
Blockages in the Hose or Brush Roll
Blockages are the most common culprit behind a red light. Shark vacuums rely on continuous, unrestricted airflow to generate suction and cool the motor. When debris clogs the hose, wand, brush roll, or dust cup inlet, airflow drops sharply, triggering the sensor.
Hose and wand blockages often occur when users vacuum up larger items, socks, small toys, clumps of pet hair, or paper. These objects lodge in the flexible hose or the wand’s elbow joint, creating a seal that chokes off airflow. To check for a hose blockage, detach the hose from both ends and look through it toward a light source. If you can’t see light, there’s a blockage. Use a straightened wire hanger or a plumber’s snake to push the obstruction out, work gently to avoid puncturing the hose.
Brush roll jams happen when hair, string, carpet fibers, or debris wraps around the roller. Over time, this buildup prevents the brush roll from spinning, which reduces agitation and blocks the air inlet at the base of the vacuum. When home cleaning routines involve high-traffic areas or homes with pets, brush roll maintenance becomes critical. Remove the brush roll cover (typically held by clips or screws) and use scissors or a seam ripper to cut away tangled hair. Pull the debris off in sections rather than trying to unwind it, it’s faster and less likely to damage the bristles.
Dust cup and filter blockages can also restrict airflow. If the dust cup is packed beyond the max fill line, suction drops and the motor strains. Similarly, clogged foam or HEPA filters create resistance. Empty the dust cup after each use, and rinse filters monthly under lukewarm water. Let filters air-dry completely for at least 24 hours before reinstalling, wet filters will trigger the red light and may cause mold growth.
Overheating Motor Protection
Shark vacuums include a thermal cutoff switch that activates when the motor reaches unsafe temperatures. This is a built-in safety feature designed to prevent electrical fires or permanent motor damage. The red light serves as the visible indicator that the motor has shut down for protection.
Overheating usually results from prolonged operation under blockage conditions. If the vacuum runs for 20–30 minutes while a hose or filter is clogged, the motor works harder to pull air through the restriction, generating excess heat. The thermal switch trips, the red light turns on, and suction stops.
Another cause of overheating is poor ventilation around the motor housing. If the vacuum is used on thick, high-pile carpet without sufficient clearance, or if the exhaust vents on the side of the unit become blocked by furniture or debris, heat can’t dissipate. This is more common in upright models where the motor sits low to the floor.
Continuous use without breaks can also overheat the motor, especially in handheld or stick models with smaller motors. If you’re vacuuming a large area, say, a whole-house deep clean, give the vacuum a 10-minute rest every 20–30 minutes. This allows the motor to cool and prevents thermal overload.
In rare cases, a red light triggered by overheating can indicate a failing motor or a faulty thermal sensor. If the vacuum overheats repeatedly even after clearing blockages and allowing cool-down time, contact Shark customer support or consider professional servicing.
Step-by-Step Solutions to Fix the Red Light Issue
When the red light appears, follow this troubleshooting sequence. Work through each step in order, most issues resolve within the first three steps.
1. Turn off and unplug the vacuum immediately. Don’t attempt to continue cleaning or reset the unit while it’s still powered. This prevents motor damage and ensures your safety during inspection.
2. Empty the dust cup. Remove the dust cup and dump all debris. Even if it doesn’t look full, residue can coat the cyclone assembly and restrict airflow. Rinse the dust cup with warm water if needed, and dry it completely before reattaching.
3. Inspect and clean the filters. Shark vacuums typically have a pre-motor foam filter and a post-motor HEPA filter. Remove both, tap them over a trash can to dislodge loose dust, then rinse under lukewarm water until the water runs clear. Squeeze gently, don’t wring or twist. Set filters on a towel in a well-ventilated area and let them air-dry for 24 hours. Never reinstall damp filters.
4. Check the hose and wand for blockages. Detach the hose from the vacuum body and the wand. Straighten the hose and look through it. If you see an obstruction, use a broom handle, wire hanger, or flexible brush to push it out. Flex the hose to loosen stubborn clogs. Check the wand’s curved joints, debris often gets stuck at bends.
5. Remove and clean the brush roll. Flip the vacuum over and locate the brush roll cover. Most Shark models use quick-release tabs or a single screw. Remove the cover and lift out the brush roll. Cut away hair and fibers with scissors, working from one end to the other. Check the belt for wear or snapping, if it’s loose or broken, replace it with an OEM Shark belt (part numbers vary by model). Wipe down the brush roll chamber to remove dust buildup.
6. Inspect air pathways. With the dust cup, hose, and brush roll removed, turn on a flashlight and look into the vacuum’s main body. Check the intake port where the hose connects and the outlet where air exits toward the filters. Use a dry cloth or compressed air to clear any visible debris.
7. Allow the vacuum to cool. If overheating triggered the red light, let the unit sit unplugged for at least 45 minutes. Place it in a cool, dry location away from direct sunlight. This gives the thermal cutoff switch time to reset.
8. Reassemble and test. Reinstall the brush roll, replace the cover, attach the hose, insert clean and dry filters, and reattach the dust cup. Plug in the vacuum and turn it on. If the red light stays off and suction feels normal, the issue is resolved. If the light returns immediately, recheck all connections, a poorly seated hose or dust cup can trick the sensor.
9. Reset the vacuum (model-specific). Some Shark models have a manual reset button, usually located near the motor housing or on the handheld unit. Consult your owner’s manual for the exact location. Press and hold the reset button for 5–10 seconds, then release. This can clear error codes in models with digital controls.
If the red light persists after completing all steps, the issue may be electrical or mechanical. Contact Shark customer service at (800) 798-7398 or visit their support site for warranty information and authorized repair centers. Many DIY home repairs are straightforward, but motor or wiring issues require professional tools and expertise.
How to Prevent Red Light Warnings in the Future
Routine maintenance is the best defense against red light warnings. Following a simple monthly checklist keeps airflow strong and extends the vacuum’s lifespan.
Empty the dust cup after every use. Don’t wait until it’s full, suction drops as soon as debris begins to pile up in the cyclone chamber. For homes with pets or heavy shedding, empty the cup mid-cleaning session if needed.
Rinse filters monthly. Mark your calendar for filter cleaning. Foam and HEPA filters should be rinsed under lukewarm water until clean, then air-dried for 24 hours. Replace HEPA filters every 12 months, or sooner if they show tears, discoloration, or persistent odors.
Inspect the brush roll weekly. If you vacuum high-traffic areas or have long-haired occupants (human or pet), check the brush roll for hair buildup once a week. Keep a pair of scissors near your vacuum storage area for quick trimming.
Check the hose and wand monthly. Detach and inspect for cracks, punctures, or clogs. Hose damage reduces suction and can cause the vacuum to overheat. Replace damaged hoses immediately, generic hoses may not fit properly, so use OEM Shark replacement parts.
Avoid vacuuming large debris. Shark vacuums are designed for dust, dirt, and small particles, not large objects. Pick up coins, small toys, hairpins, and paper scraps by hand before vacuuming. This prevents clogs and protects the motor.
Give the vacuum rest breaks. If you’re cleaning a large space, turn the vacuum off for 10 minutes every 20–30 minutes of continuous use. This prevents motor overheating, especially in stick and handheld models.
Store the vacuum properly. Keep the vacuum in a cool, dry location. Avoid damp basements or hot garages, as moisture can damage filters and extreme heat can warp plastic components. Store with the hose and wand detached to prevent kinks.
Use the right attachments for the job. Shark vacuums come with specialized tools, upholstery brushes, crevice tools, and pet hair attachments. Using the correct tool for each surface reduces strain on the motor and minimizes the chance of clogs.
Schedule an annual deep clean. Once a year, disassemble the entire vacuum. Wipe down all plastic parts, clean the cyclone chamber, inspect seals and gaskets, and check the power cord for fraying. This is also a good time to replace the belt and filters, even if they don’t look worn. Consistent upkeep, similar to maintaining household appliances, prevents small issues from becoming major repairs.
Conclusion
A red light on a Shark vacuum is a straightforward diagnostic tool, not a death sentence for the machine. Most issues trace back to blockages or overheating, both of which are fixable with basic maintenance. Clear the hose, clean the filters, inspect the brush roll, and give the motor time to cool. With consistent care and attention to airflow, your Shark vacuum will run reliably for years without triggering that red warning again.