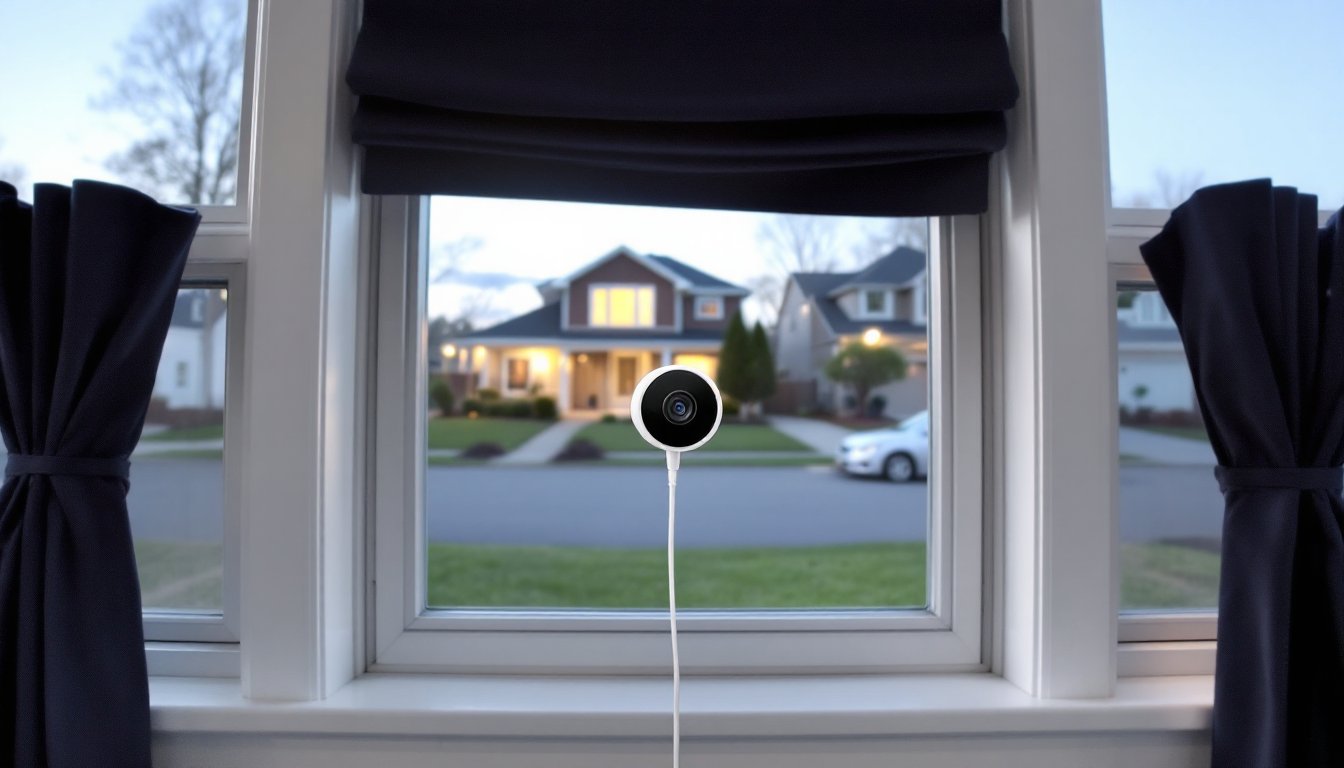
Mounting a security camera to monitor your front yard, driveway, or backyard doesn’t always mean drilling holes through siding or running outdoor power lines. For renters, apartment dwellers, or anyone who wants a low-commitment surveillance solution, placing a Wyze camera indoors against a window offers a surprisingly effective alternative. It’s a clean install that takes minutes, no permits, no exterior work, no landlord approval needed. But getting clear footage through glass requires more than just sticking a camera on the sill. Glare, reflections, and infrared bounce can turn your security feed into a useless mirror at night if you don’t set it up correctly.
Table of Contents
ToggleKey Takeaways
- A Wyze window camera mounted indoors against glass provides an effective, renter-friendly surveillance solution that requires no drilling, permits, or exterior wiring.
- Disable infrared LEDs in your Wyze camera settings and rely on external lighting—motion-activated floodlights or ambient light—since IR light reflects off glass and ruins nighttime footage.
- Mount the camera flush against the window with no gaps, use blackout curtains inside, and position it perpendicular to the glass to minimize reflections and glare.
- The Wyze Cam v3 and newer v4 models feature Starlight sensors that excel in low-light conditions, making them ideal for window placement with local microSD storage instead of cloud subscriptions.
- Tape over the camera’s status LED, adjust WDR settings to handle headlight glare, and position the camera in clear glass sections away from window grids to maintain image quality.
What Is the Wyze Window Camera and How Does It Work?
Wyze doesn’t manufacture a camera specifically labeled “window camera,” but several of their indoor models, particularly the Wyze Cam v3 and Wyze Cam OG, work effectively when placed against window glass to monitor outdoor areas. These are compact, wired cameras that stream 1080p video and connect to your home Wi-Fi network. The key difference from outdoor-rated cameras is that they’re designed for indoor use, so you’re leveraging an interior window as both a barrier and a viewing portal.
The camera captures video through the glass using a standard CMOS image sensor. During daylight, this works without much intervention, light passes through cleanly, and the camera records outdoor activity. The challenge comes after dark. Most security cameras use infrared (IR) LEDs to illuminate scenes in low light, but IR light reflects off glass like a mirror. You’ll end up recording the glow of the camera’s own LEDs instead of the yard outside. Wyze cameras allow you to disable IR and rely on ambient light (street lamps, porch lights, motion-activated floodlights) or use external IR illuminators positioned outside the window.
These cameras send footage to the Wyze app, where you can view live streams, review motion-triggered clips, and adjust settings like motion detection zones, sensitivity, and recording schedules. Cloud storage is available via Wyze Cam Plus subscription (around $2/month per camera as of 2026), or you can use a microSD card (up to 32GB or 64GB, depending on the model) for continuous local recording. For window placement, local storage is often the better choice, it eliminates dependency on cloud upload speeds and keeps footage accessible even if your internet drops.
Key Features That Make Wyze Window Cameras Stand Out
Wyze cameras are budget-friendly, typically under $40, which makes them accessible for multi-camera setups. But price isn’t the only reason they’re popular for window monitoring. The Wyze Cam v3 includes a Starlight sensor, which performs better in low-light conditions than older Wyze models. This is critical when you’re relying on ambient outdoor lighting instead of IR. The sensor can pick up usable color video down to about 0.3 lux, roughly equivalent to a quarter moon on a clear night.
Motion detection can be customized with detection zones, so you’re not getting alerts every time a car passes on the street or tree branches sway. You can mask off sections of the frame and focus only on your driveway, walkway, or specific entry points. The cameras also support two-way audio, though the speaker quality is limited, it’s enough to bark a warning at a porch pirate, but don’t expect to hold a conversation through the glass.
Integration with smart home platforms is another strength. Wyze cameras work with Amazon Alexa and Google Assistant, so you can pull up live feeds on smart displays or trigger recording based on other smart home events (like a smart lock being opened or a motion sensor tripping). IFTTT compatibility adds even more automation possibilities. Many smart home product reviews highlight Wyze’s ecosystem compatibility as a major advantage over proprietary systems.
Night Vision and Image Quality Through Glass
As mentioned, standard infrared night vision is useless through a window, the IR LEDs reflect back into the lens, washing out the image. The workaround is to disable IR mode entirely in the Wyze app. Navigate to the camera’s settings, tap “Advanced Settings,” and turn off infrared LEDs. This forces the camera to rely on visible light only.
For this to work, you need external illumination. Motion-activated floodlights are ideal, they light up the scene when someone approaches, which both improves image quality and acts as a deterrent. LED floodlights with 1,000-2,000 lumens and a warm white (3000K) or daylight (5000K) color temperature provide enough light for clear video without harsh glare. Position them at an angle so they illuminate the area you’re monitoring, not the window itself.
Alternatively, low-wattage continuous outdoor lighting, such as landscape lights along a walkway or a dusk-to-dawn bulb over the porch, gives the Starlight sensor enough to work with. The image won’t be as vibrant as daytime footage, but it’ll be clear enough to identify people, vehicles, and activity. If you’re committed to IR, you can mount an external IR illuminator outside the window, pointed at the yard. This keeps IR light out of the camera’s frame while still illuminating the scene in infrared. It’s a more complex install, but it works if external lighting isn’t an option.
Installing Your Wyze Camera for Optimal Window Monitoring
The install itself is straightforward: plug in the camera, mount it against or very close to the glass, and connect it via the Wyze app. But getting clean footage requires attention to a few critical details.
First, position the camera flush against the glass. Even a half-inch gap can allow reflections from interior lights or the camera’s own status LED to bounce into the lens. Use a suction cup mount or adhesive mount that presses the lens directly to the window. Some users 3D-print custom lens hoods or use rubber grommets to create a light seal around the camera front. The goal is to eliminate any space where stray light can interfere.
Next, consider window treatments and interior lighting. Close blinds or curtains on either side of the camera to block ambient room light from reflecting in the glass. If you’re monitoring 24/7, keep the room dark at night, turn off lamps, TVs, and overhead lights near the window. Even a dim nightlight across the room can cause enough reflection to ruin nighttime footage. For continuous monitoring setups, blackout curtains with a small cutout for the camera work well.
Camera angle matters. Mounting the camera perfectly perpendicular to the glass minimizes reflections. Angling it even slightly can catch reflections from interior surfaces or outdoor light sources at odd angles. Use a leveling app on your phone to check that the camera is square to the window. If your window has multiple panes or grid mullions, position the camera in a clear section of glass, shooting through divided panes adds distortion and reflections.
Power is simple: Wyze cameras use a USB-A to micro-USB cable (or USB-C on newer models) and a 5V/1A or 5V/2A wall adapter. You’ll need an outlet within about six feet, or you can use a USB extension cable or power bank if an outlet isn’t nearby. Don’t use cheap extension cables, voltage drop can cause the camera to reboot or fail to connect.
Avoiding Glare and Reflection Issues
Glare is the enemy of window camera placement. Direct sunlight hitting the lens will wash out the image and can even damage the sensor over time. If your window faces east or west, expect harsh backlighting during sunrise or sunset. You can mitigate this with exterior shading, an awning, overhang, or even a strategically placed outdoor umbrella, but if that’s not feasible, consider switching to a different window or accepting reduced image quality during those hours.
Headlight glare is another issue. If your camera monitors a driveway or street, car headlights can cause temporary blindness in the footage. Adjust the camera’s WDR (Wide Dynamic Range) setting in the app to help balance bright and dark areas in the frame. It won’t eliminate glare entirely, but it reduces the blown-out effect.
For interior reflections, tape over or disable the camera’s status LED. That tiny blue or red light is enough to create a distracting spot in nighttime footage. Some users cover it with black electrical tape: others disable it in the camera settings if the model allows. Also, disable the IR LEDs as discussed earlier, this is non-negotiable for through-glass use.
If you’re still getting reflections, try a polarizing filter. Some DIYers cut a circular polarizing filter (the kind used in photography) to fit over the camera lens. This can reduce glare from glass and wet surfaces, though it also cuts down overall light transmission, which may hurt low-light performance. Test it before committing.
Best Wyze Camera Models for Window Placement
Not all Wyze cameras are equally suited for window monitoring. Here’s a breakdown of the top options as of 2026.
Wyze Cam v3 is the most popular choice. It’s weather-resistant (IP65-rated), though that’s less relevant indoors. The Starlight sensor is the real draw, it handles low light better than earlier models, which is critical when you’re relying on ambient outdoor lighting instead of IR. It records in 1080p at 20fps, has a 130° field of view, and supports local microSD storage up to 32GB. The mounting base is magnetic, making it easy to adjust and reposition. Price is typically around $35-$40. According to smart home device reviews, the v3’s low-light performance and price make it a standout in the budget camera category.
Wyze Cam OG is a newer option with a similar feature set but a slightly different design. It has a 3.5mm AUX port, which is unique, this lets you connect an external USB accessory like a spotlight or siren. It also supports up to 64GB microSD cards, doubling the local storage capacity of the v3. Image quality is comparable, with a Starlight-equivalent sensor and 1080p recording. The OG is often bundled with a Wyze Telephoto lens accessory, which narrows the field of view to 27° but gives you 3x optical zoom, useful if you’re monitoring a specific area like a mailbox or gate from a distance. Price hovers around $20-$25 for the standard version, or $40 for the telephoto bundle.
Wyze Cam Pan v3 adds pan, tilt, and zoom functionality, which can be helpful if you want to remotely adjust the viewing angle without moving the camera. But, the physical movement can cause vibrations against the window, and the bulk makes it harder to mount flush against glass. It’s better suited for interior room monitoring than window placement, but it can work if you have a wide window ledge and don’t mind some reflections.
Wyze Cam v4 was announced in late 2025 and started shipping in early 2026. It bumps resolution to 2.5K (2560×1440) and includes an improved sensor for better low-light color accuracy. It’s slightly more expensive (around $50), but the higher resolution helps when you’re zooming in on footage to identify faces, license plates, or other details. If budget allows, this is the best current option for window placement, though the v3 remains a solid value pick. Many home automation guides now recommend the v4 for users who prioritize image clarity over cost.
Avoid the original Wyze Cam v1 and v2, their sensors don’t perform well in low light, and they lack the mounting flexibility of newer models. If you already own one, it can work in a pinch, but expect grainy nighttime footage and more frustration with reflections.
Conclusion
Using a Wyze camera for window monitoring is a practical, low-cost alternative to outdoor installation, especially for renters or quick setups. Success comes down to eliminating glare, disabling IR, and ensuring external lighting. The Wyze Cam v3 or v4 paired with motion-activated outdoor lights will give you clear, usable footage without the complexity of running wires through walls or dealing with weatherproofing. Just keep the lens flush to the glass, the room dark at night, and your expectations realistic about nighttime image quality.